
By Melissa Ludden Hankens
The more time I spend weaving, the more I realize just how much I don't know. I'm not talking so much about how to weave this or that pattern or how to weave well. These are areas where I am making steady improvements. I'm talking more about how the yarn on my shelf turns into a finished product that, more often than not, is NOT what I was hoping to weave.
Where do I go wrong? This may not be a problem so much as it is knowingly choosing an uncertain outcome. I have yet to create a woven item by following a pattern, though I have certainly been inspired by projects I have seen in magazines, books and online. And of course I have used patterns from sources like Marguerite Porter Davison's A Handweaver's Pattern Book and Jane Patrick's The Weaver's Idea Book.
But every time I weave something I start with a vision of what I want to create, I sketch out an idea, and I go from there. The resulting woven item, more often than not, isn't quite what I had dreamed up in my mind.
The Project
The next problem is that I almost always try to source yarn from my stash. (Oh, the stash!) Like many of you, I have quite a bit of yarn, and it stares at me every day. It stares so intently that I can't even consider buying more while so many lovely cones and skeins sit there patiently waiting. So I use them, even when I know in my heart that they may not be quite right for the job.
And samples help. Yes they do. Just because you have woven with a particular yarn before doesn't mean you automatically know how it will behave when woven using a different weave structure.
Lesson learned.
This project idea started at a guild meeting a few months ago. One of my fellow weavers, Phyllis, brought in some spa washcloths she had woven. If you missed the spa washcloth phenomenon from a couple of years back, I urge you to hop over to Weavezine - Spa Wash Cloth on a Rigid-Heddle Loom and take a look at this brilliant little design by Syne Mitchell (woven on a Cricket Loom!). As I was admiring the looped pile, I got to thinking that perhaps I could selectively embellish my weaving with this fluffy bumpy technique.
But how could I get the embellished design in just the right place? To help with this, I decided I would add my looped pile design after I had woven the fabric but before the cloth was removed from the loom. This would give me a nice grid under tension to work on, and I could get the fluffy, bumpy flower design I was thinking about to fall in just the right place.
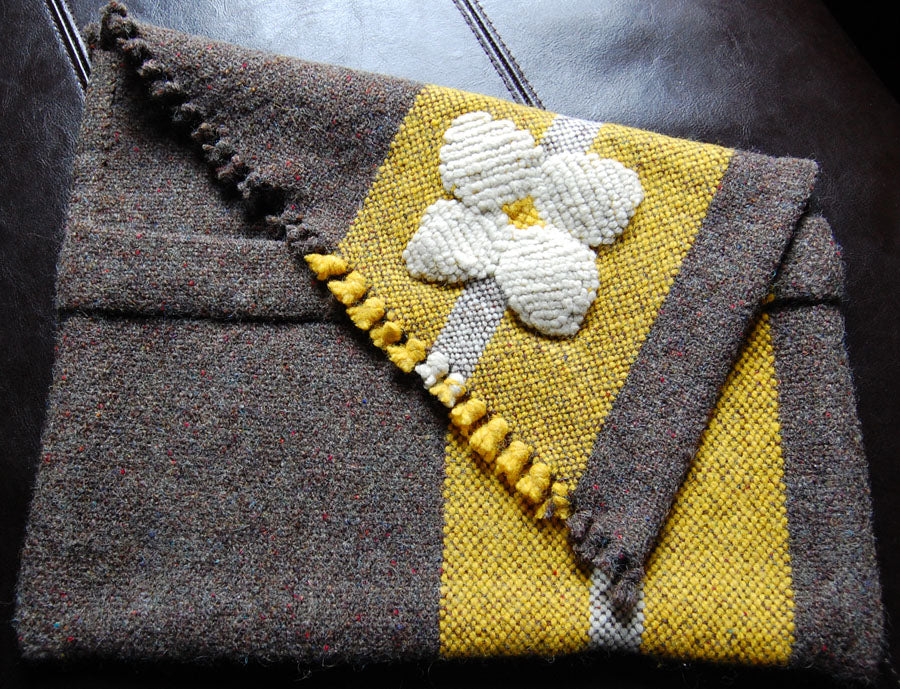
I wanted to create a fabric envelope to hold a special notebook and pen that I use to jot down my writing ideas. I was envisioning a densely-fulled fabric that wasn't too stiff or too floppy with an inside pocket to hold my pen and a flap closure which would sport my flower embellishment for that little extra sparkle.
I really wanted my envelope to be a bright, sunny springtime yellow. I had some yellow Harrisville Highland, but not nearly enough for this project. I then hopped off of the spring train and onto the autumn train, and decided to use Bartettyarns brown with a stripe of the Harrisville yellow. I had woven with Bartlettyarns before, and while it had fulled somewhat, I knew that it wasn't going to full to the degree I needed for my envelope.
I ignored the voice in my head. I will tell you right now that my finished envelope is lacking that sunny disposition I was hoping to create. But it came from my stash.
But it's not quite what I wanted it to be. But it came from my stash.
But it's not quite what I wanted.
Aye! Lesson learned yet again.
So I planned my project, optimistically overestimating how much my fabric would shrink in the wash. The last time I had woven with Bartlettyarns, I wove a 2-2 twill. This new project was going to be in plain weave, and would not be as dense or full as much as a twill fabric… You know how this ends, right?
Weaving
I added a couple of yellow stripes and a white stripe for accents, and wove the length of my warp in plain weave. As I neared the end of the warp, I started to weave a tapered end. For a taper that ends with the long point on the left, I began with a shuttle in my left hand. I wanted a gradual taper, so I decided to decrease the width every other pick by six ends. I inserted the shuttle into the shed, and popped it out of the shed six ends before I reached the selvedge. (Don't forget to count the ends from both the top and bottom of your shed.) I changed sheds and wove back to the other selvedge.

I changed sheds again and wove across six ends from my last stopping place (twelve ends from the selvedge). I continued passing my shuttle back and forth, decreasing the width every other pick by six ends. When six ends were left, I passed the shuttle back and forth one extra time for good measure.
I added my loop pile flower embellishment at this point. You will need a yarn needle and a thin knitting needle to hold the loops. I used a US size 3. Start by placing the center of your flower. I used a simple cross stitch to create a yellow center. If you haven't done cross stitch, have no fear. It couldn't be easier. Your plain weave fabric is a perfect grid of little squares that make it really easy to stitch tiny Xs. Here is a nice little photo gallery of the steps. There are so many other possibilities for embellishments: You could even go crazy by adding some fun little rya knot pistils and stamens in a sparkly yarn. Oh the possibilities!


center of flower worked in cross stitch
Embellishing Your Weaving
Once the center of your flower is in place, you are ready to form the petals. Keep in mind that when you wash your weaving, it will full and the spaces will fill in. I made my loops on the diagonal by pulling my yarn up through a hole, over the knitting needle and down again through a hole on the diagonal. Repeat this action to create a row of loops. I found that having two needles was helpful. As you move from one row of loops to the next, you'll want to start the new row before you pull out the old knitting needle.


petals in loop pile
Finishing
Once you have completed your flower, you are ready to cut your weaving from the loom. I cut off six ends at a time (the size of each decrease) and knotted them with an overhand knot to secure. Trim the fringe on both ends to about 3" in length.
Next, secure the other end of your weaving with zigzag machine stitching. I like to use the walking foot, as it grips and pulls your fabric through from both the top and the bottom.
Depending on what yarn you use, you will want to take care with the washing of your fabric so that it fulls evenly. I have a wool cycle on my washing machine that I like to use, and with the Bartlettyarns, I also put my weaving in the dryer, though I didn't experience a lot of shrinkage with this yarn. (An alternate yarn that will full well is Brown Sheep Lamb's Pride.)
Once my fabric was washed and dried, I trimmed the knotted fringe to just over ¼". My notebook is 12 ½" x 9", and I wanted the notebook to peek out when the flap was opened. (You'll be folding the unknotted edge of your fabric up to create the envelope.) Taking a ½" hem allowance into account, you'll want to measure the fabric you'll need for your envelope.
If you have added extra length to create an inside pocket, now is the time to cut that piece of fabric off. I like to use my sewing machine to create two rows of stitches running parallel along each side of where I want to cut. Once this channel is created, I can cut between the two rows of stitches and I end up with two cut edges that are secured. This is much easier than trying to secure the cut edge of your weaving with a sewing machine after you have made the cut.
Another technique to embellish your weaving is to use ribbon to cover your cut edges. When hemming bulkier fabric like this, it means you only have to fold the cut edge over once rather than twice to ensure it is hidden. I pinned a length of ribbon along the cut edge of my fabric so that most of the ribbon was hanging over the cut edge, and machine stitched this in place. I then folded the edge over, pinned it in place, and hand stitched the hem down.

I used this same technique for the inside pocket. I machine stitched a length of ribbon around the outside of the piece I had cut for my pocket, and then hand stitched it in place inside the envelope.
To stitch your envelope together, simply fold your ribbon covered hemmed edge up, wrong side out, and stitch along the selvedges to secure. You may find that once your turn your bag right side to, the flap of your envelope is wider than the body of the envelope. If this bothers you, you can easily hand hem the flap edges down to match the width (I did).
While my woven envelope didn't exactly meet my expectations aesthetically, I think I will be embellishing my weaving a bit more frequently moving forward.
Details
Woven on my 20" Flip Loom in plain weave
Warp yarn: a sport or worsted weight yarn that will full in the wash (not a superwash)
Additional supplies: yarn for flower, ribbon for trimming, sewing machine, yarn needle, two thin knitting needles
Warp length: 59"
Width in reed: 20"
Sett: 10 epi for my combination of Bartlettyarns sport and Harrisville Highland
30 ends brown, 30 ends yellow, 10 ends white, 30 ends yellow, 100 ends brown
Pre-wash dimensions: 18 3/8" wide x 36" short edge and 43 ½" long edge
Post-wash dimensions: 16" wide x 29 ½" short edge and 35 ½ long edge