Bring fiber magic to your inbox. Subscribe to the Schacht monthly e-newsletter!
February 2018

Join the Community

We encourage you to join us on Instagram and Facebook to get updates and inspiration for all your weaving and spinning endeavors.

Tag your post with #schachtspindle

Upcoming Events

Estes Park Wool Market

June 8, 2023 Meet us in Estes Park!

New York State Sheep and Wool Festival (Rhinebeck)

October 19, 2023 Sheep and Wool Festival website

February 2018 Newsletter

Stash Buster Pillow Pair

By Jane Patrick

I love making pillows, so this pillow challenge was just the motivation I needed to weave up some pillows for my new studio. As far as I’m concerned, texture is a must for a decorative pillow. It was with this start of an idea that I began designing. My first stop was to check out Peter Collingwood’s The Techniques of Rug Weaving. If you don’t have this book, I recommend it for its thorough treatment of a variety of techniques, whether you are weaving rugs or not. I wanted to weave double corduroy on four shafts because it is a speedy weave and makes a delicious pile. Collingwood’s discussion is clear and helpful and I picked a draft that seemed like it would work for my project. Essentially, in double corduroy you just weave long floats which are held together with plain weave and are cut later for the pile. (By the way, don’t worry if you don’t have a floor loom, I’ll share with you below how you can create these pillows on your 20” Flip Loom.

Finished sizes: Pillow #1—17”x 18 ½”; pillow #2—16” x 17”

Weave Structure: Pillow #1–Double corduroy and plain weave; pillow #2—floats and plain weave

Equipment: 4-shaft loom with a 20” weaving width. I used a Schacht Mighty Wolf, but you could weave this on a Baby Wolf or a Schacht Standard Floor Loom; 1-2 13” Schacht boat shuttles; 1-20” Schacht stick shuttle.

You’ll also need: two pillow forms or pillow stuffing for two pillows, a long pair of sharp scissors, sewing machine, and an iron.

Yarn: I gathered up all of my white and off white yarns in various sizes and textures and fiber content and put them together for the pattern (pile) weft. For warp I used Navajo rug warp from Brown Sheep Company and for the plain weave pillow backs I used the same Navajo rug warp in combination with novelty yarns.

From Top left, clockwise: Navajo rug warp, novelty pigtail yarn, paired #7 Bambu and slub cotton yarn bundle used for pillow #2, yarn bundle used for pillow #1.

Number of warp ends: 202, including floating selvedges.

Warp length: 3 ½ yards which includes 25” loom waste.

Warp width: 20”

EPI: 10

PPI: Varied between 10 for the pillow backs and 6 for the pillow fronts.

Draft: This draft is a version of the one on page 420 in The Techniques of Rug Weaving by Peter Collingwood.

Weaving: Follow the plan below. Use treadling sequence 1 for the corduroy pillow front and treadling sequence 2 for the warp float pillow front. Weave as follows:

3 ½” plain weave with Navajo rug warp

16 ¼” corduroy in this manner: repeat treadling #1 5 times, then weave 1” plain weave. Repeat for a total of 4 bands of corduroy separated with 1” plain weave. Do not cut the floats yet.

3 ½” plain weave with Navajo rug warp

27” textured plain weave for back. I wove a sequence of 3 rows of Navajo rug warp, 1 row of pigtail novelty yarn.

3 ½” plain weave with Navajo rug warp

17” textured floats following treadling 2.

3 ½” plain weave with Navajo rug warp


28” of pick-and-pick plain weave, alternating a row of Navajo rug warp and a row of two yarns paired, #7 Bambu and a slub cotton.

3 ½” plain weave with Navajo rug warp

Steam iron on the wrong side. If you are using synthetic fibers, you may find that you will need to use a press cloth. I like to make an envelope style pillow back because it is easy to make and doesn’t require a zipper. You can add Velcro to help keep the overlap secure, but because I used a generous, nearly 6” overlap, I didn’t find it necessary to use Velcro in this case.Finishing: Remove the weaving from the loom and tie knots in the ends to prevent raveling. Hand wash in a large sink or tub (if the sink is too small). I used Dawn dish detergent and very warm (but not hot) water. I gently kneaded the fabric by hand and then let it soak for 15 minutes. I rinsed the fabric in warm water until the water ran clear. I rolled the fabric up in a large bath towel and pressed on the bundle to squeeze out as much moisture as possible. I then hung the fabric over the shower door to dry—it took nearly a day and a half to thoroughly dry, due to the thickness of the textured pillow fronts.

Because this is a relatively coarse weave, I double stitched across all cut edges and seams. I stitched the pillow together on the plain weave side so as to avoid the long floats on the pillow front. I did not cut the corduroy floats until after I had assembled the pillow.

See this newsletter project for pillow assembly.

Hints:

Stash: I have a lot of it and I gathered up everything in white and off white that I had. I used a combination of thick, fuzzy, texture novelties, fine mohair with sparkles, and shiny pearl cotton. I liked the explosion of texture and the depth that different shades of white lent to the fabric surface. For the back, I decided to add just a hint of texture (since I could) and tried two different versions for the pillow backs. The fabric was more interesting and more fun to weave, though a bit slower since two shuttles were used.

I warp front to back (that is, I thread the reed first and then the heddles). To help avoid errors, I break the threading up into logical sections, count the number of heddles on each shaft in this section and then thread this section. If I don’t end correctly, chances are I made a threading error.

To save on loom waste, I put our Schacht treadle tie-up cords to new use. I tie overhand knots in 1” sections of the warp. I then loop the tie-up cords around the apron rod and attach each warp knot to a tie-up cord with a lark’s head knot.

Because the pattern/float yarn is bulky, I used a stick shuttle the width of my weaving. I used a 13” boat shuttle for the Navajo rug warp.

Use a floating selvedge. Since the selvedge edge isn’t caught every time, I used a floating selvedge to avoid having to manually go around the edge threads. The floating selvedge “floats” between the threads that aren’t raised and the raised threads. You pass over the floating selvedge when you enter the shed and under it when you exit. After a few inches, the movement will be nearly automatic.

Rigid heddle alternative

You can weave a very similar fabric on your rigid heddle loom. Use the same warp sett and width, but allow just 18” loom waste instead of 25”. Weave the plain weave backings just as I’ve done here, but weave the pattern floats in this modified way.

Pillow #1

Pick-up stick pattern: 2 up, *10 down, 2 up, repeat from *, end with 2 up.

Weaving:

Step 1: Up

Step 2: Pick-up stick, supplementary weft

Step 3: Down

Step 4: Pick-up stick, supplementary weft

Repeat these 4 steps

To weave a similar pattern as the corduroy pillow shown, weave 3 ½” plain weave, *4” of the pick-up pattern, 1” plain weave*, repeat between * 3 more times ending with 3 ½” of plain weave.

Pillow #2

Pick-up stick A: 2 up, *6 down, 6 up* repeat between *, end with 2 up.

Pick up stick B: 2 up, * 6 up, 6 down* repeat between *, end with 2 up.

Note: it is correct that you are going to pick up 2 and then 6 at the selvedges.

Weaving:

Weave 3 ½” plain weave

Step 1: Pick-up stick A, use supplementary weft

Step 2: Up

Step 3: Down

Step 4: Pick-up Stick B, use supplementary weft

Step 5: Up

Step 6: Down

Repeat for pattern.

End with 3 ½” plain weave

Dear Tabby – How Much Yarn Do I Have?

Dear Tabby

I have some yarn that I want to use for a project but I don’t know how much I have. I don’t want to run out. Please help.

If you don’t have the original packaging to know what the yards per pound is of the yarn in question. You can easily figure this out with a McMorran Yarn Balance and a scale. This answer comes to you from Woven Scarves, by Jane Patrick and Stephanie Flynn Sokolov.

–Confused

Dear Confused,

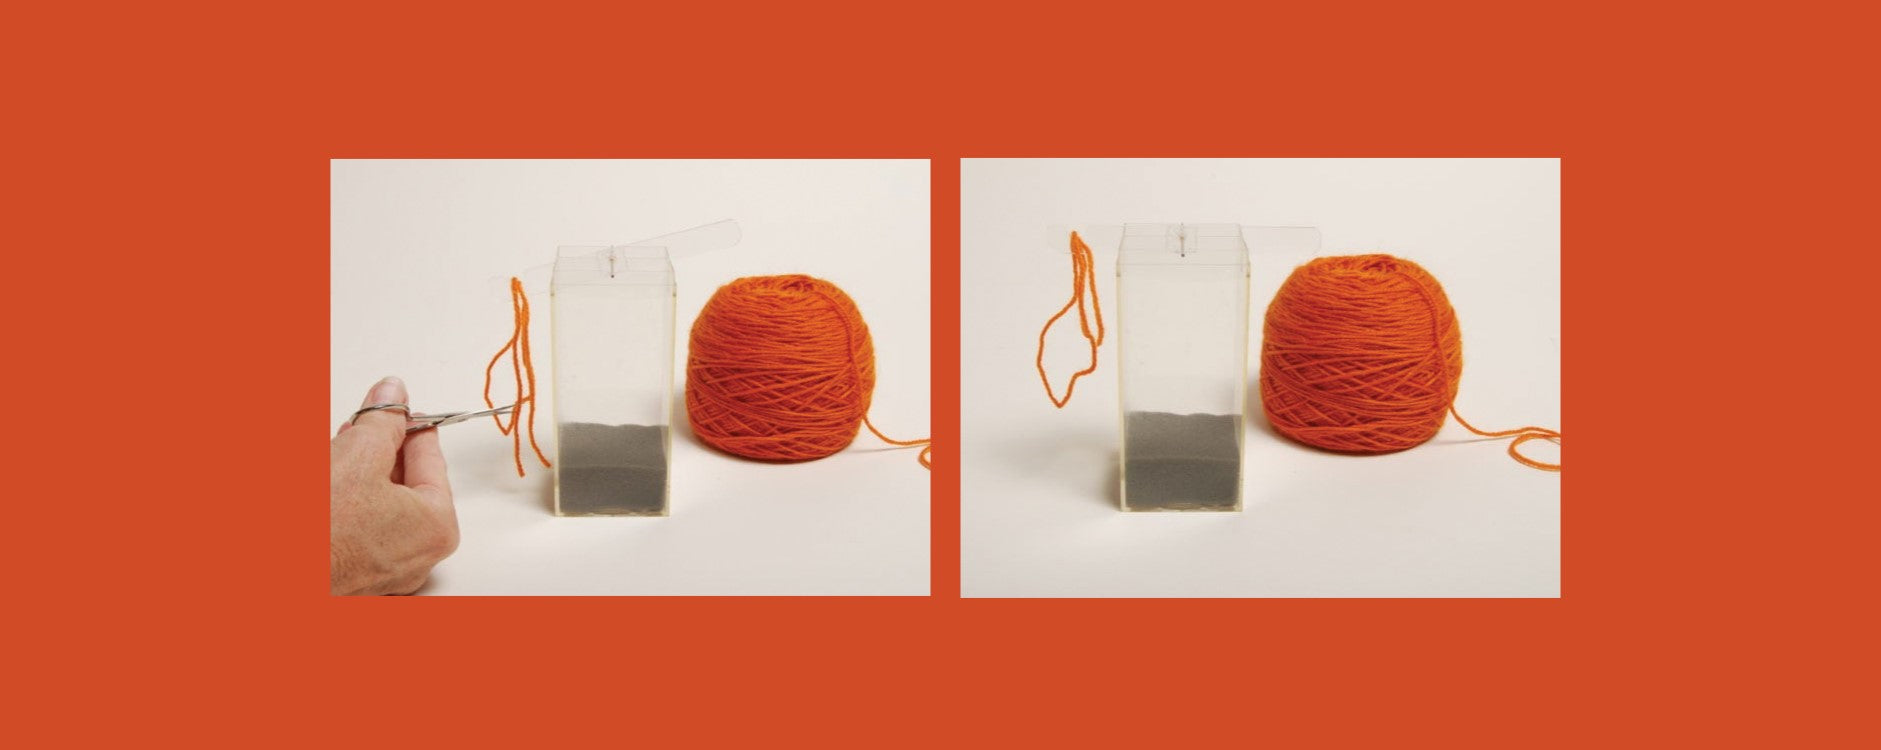
Using stash yarn for projects can be tricky if you don’t know how much yarn you have. You can always take your chances by eyeballing the yarn and guessing at the quantity. However, if you want to know for sure, you can use a McMorran Yan Balance (or the Yarn to Yards Balance available from Eugene Textile Center). This simple tool weighs a length of yarn and lets you calculate the yardage per pound of the yarn. You can then weigh your yarn on a scale (such as a cooking scale shown here) to determine how many yarns you have. Here’s how it works:

Step 1. Balance the pin of the balance arm in the slots on the sides of the balance.

Step 2. Place a length of yarn in the notch of the arm.

Step 3. Cut the yarn little by little until the arm is balanced.

Step 4. Measure this length of yarn on a ruler.

Step 5. Weigh the ball of yarn on a scale to find out the total weight of the yarn you have.

Step 6. To know if you have enough yarn, you’ll need to do a little math.

In this example, our yarn measured 15” in length. We multiplied 15 by 100 to determine that there are 1,500 yards per pound of this yarn. We then weighed the ball of yarn and learned that it weighted 4 ounces. To find out how many yards were in these 4 ounces, we solved a simple equation:

1,500 yd = X yd

16 oz         4 oz

First multiply 4 x 1,500 = 6,000. Then divide this number by 16 to give the total amount of yarn: 6,000/16 = 375 yards.

Featured Products