By Kate White
I was so inspired by Judy’s Crabapple Scarves that I finally took the leap into color. (I see Stephanie has been spinning with color too – there must be something in the air!). I had been wanting to experiment with natural dyes for some time, and Judy’s scarves made me realize that color can be both straightforward and powerful. With Rosh Hashanah coming up, I decided to make a challah cover – it could be small, simple, and square and let me focus on the dyeing. It is traditional to eat apples and honey at Rosh Hashanah, as a wish for a sweet new year, so from the beginning I had a direction but not a vision.
First I had to learn about dyeing. I got the Earthues Natural Dye Starter Kit (I love kits!) and spent a weekend sampling the dyes. I made 64 sample bundles, using 4 fibers, 2 mordants, and 8 colors. Since I was dyeing such a tiny amount of fiber (all of the bundles together were less than one ounce), I used a canning pot and mason jars for my dyebaths. This was the first of many shortcuts I took that would likely alter the integrity of a dye practice over time, but my goal this time around was just to get started. I was absolutely thrilled with the richness and variety of tone, and the color cards I made are a treasure in themselves.

Rather than use color in a pattern, I wanted to create my color variation through the dyeing. I puzzled over how I would dye a warp and a weft to fade between several colors. These acrobatics helped me understand the geometry of weaving a bit better – to get the same effect in weft and warp, the dye procedure would have to be different. I also learned about many of the winding tools, eventually using a swift, niddy noddy, and warping board to prepare yarn for dyeing in the effect that I wanted.
For this project, I chose Ashland Bay Windsor (worsted weight, 60% merino/40% silk, ecru). I dyed a sample warp by making a skein, which I then stretched out and tied in plastic wrap, leaving free only the section to be dyed in the first color. I used 3 different dye baths, rewrapping between each bath. The baths went from dark to light, which I think resulted in some bleeding and contamination of color. One of the colors was not concentrated enough and the yarn came out lighter than I had hoped. I also realized that dyeing a basic skein would not result in a gradated warp. The result of my sample was a perfectly serviceable skein that I will use for another project.
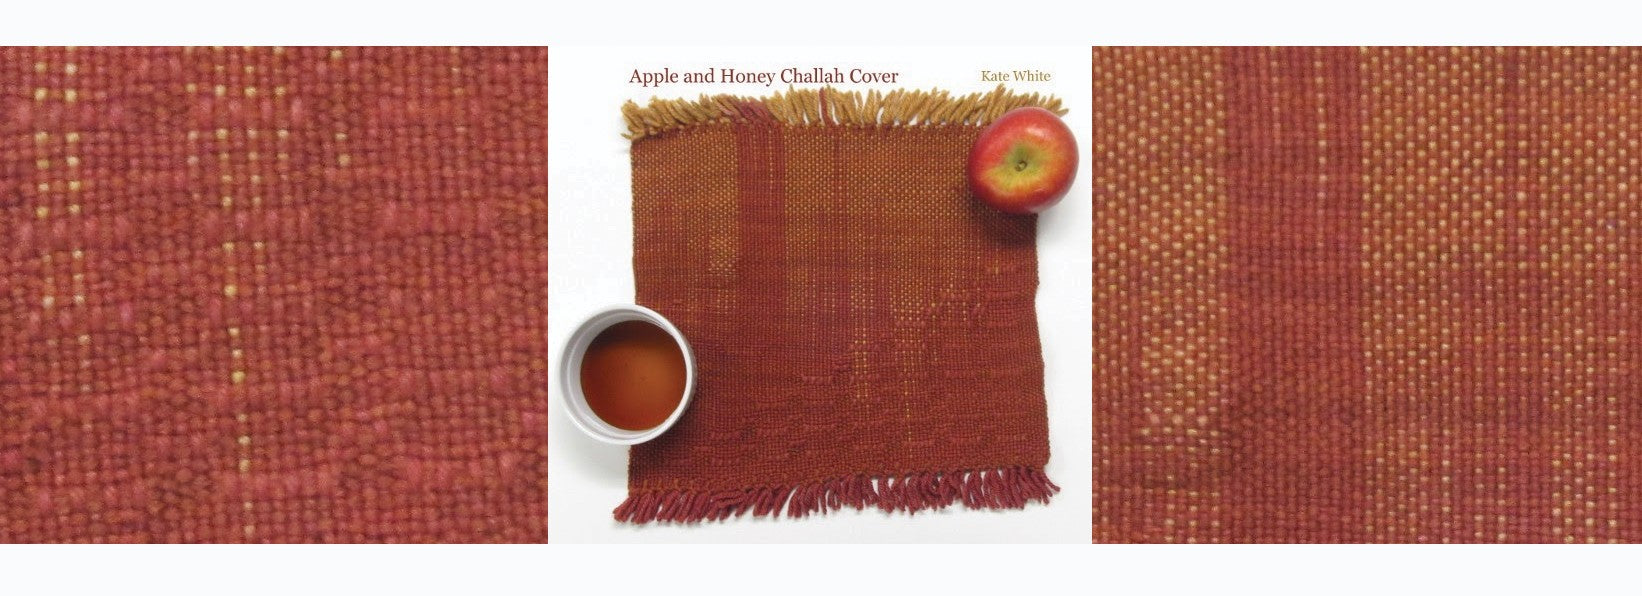
For the final product, I made a 2-yard warp on a warping board and dyed 2/3 of it in my honey color (a blend of osage orange and madder), and the remaining third in apple red, a blend of cutch, osage orange, madder, and cochineal. My weft was dyed a single color – a more madder-heavy blend of honey, which resulted in a nice autumn brown color. All yarns were mordanted in alum with cream of tartar.
I warped a 15" Cricket Loom about 13.5" inches wide in an 8-dent reed, and wove a square. I introduced a subtle honeycomb pattern, following the instructions in The Weaver’s Idea Book, with pick-up stick A repeating *4 up, 2 down* and pick-up stick B repeating *2 up, 4 down*. For each repeat of the pattern warpwise, I decreased a repeat weftwise, to create a triangle. I wove a 6-thread plain-weave border on all sides, hemstitched the ends, and left a short fringe.


Although the end product was relatively quick and simple, there was so much opportunity to learn and adjust. Dyeing to a vision would require deep knowledge of both weaving and dyeing, and I found myself simplifying at every step; no matter, because the colors were so rich that they would speak for themselves. Still a relatively inexperienced rigid heddle weaver, I realized about halfway through that I was really beating hard – upwards of 15 picks per inch for this 8-dent project.
In future projects I’ll be more mindful of this; in this project it would have yielded the pattern that I had planned, and also made visible more of the warp that I had worked so hard on. Overall, though, I'm pleased with this work, if for no other reason that I actually finished it! By going step-by-step and fine-tuning along the way, I allowed a space for my wild fabric fantasies to meet the reality of my skill and patience. The end result is simple but elegant, something I can hold in my hands and in my heart, something deserving of a place on my holiday table. L'shanah tova!

