Green-Gray Topper
Designed by Jane Patrick and Sara Goldenberg; woven and assembled by Sara Goldenberg
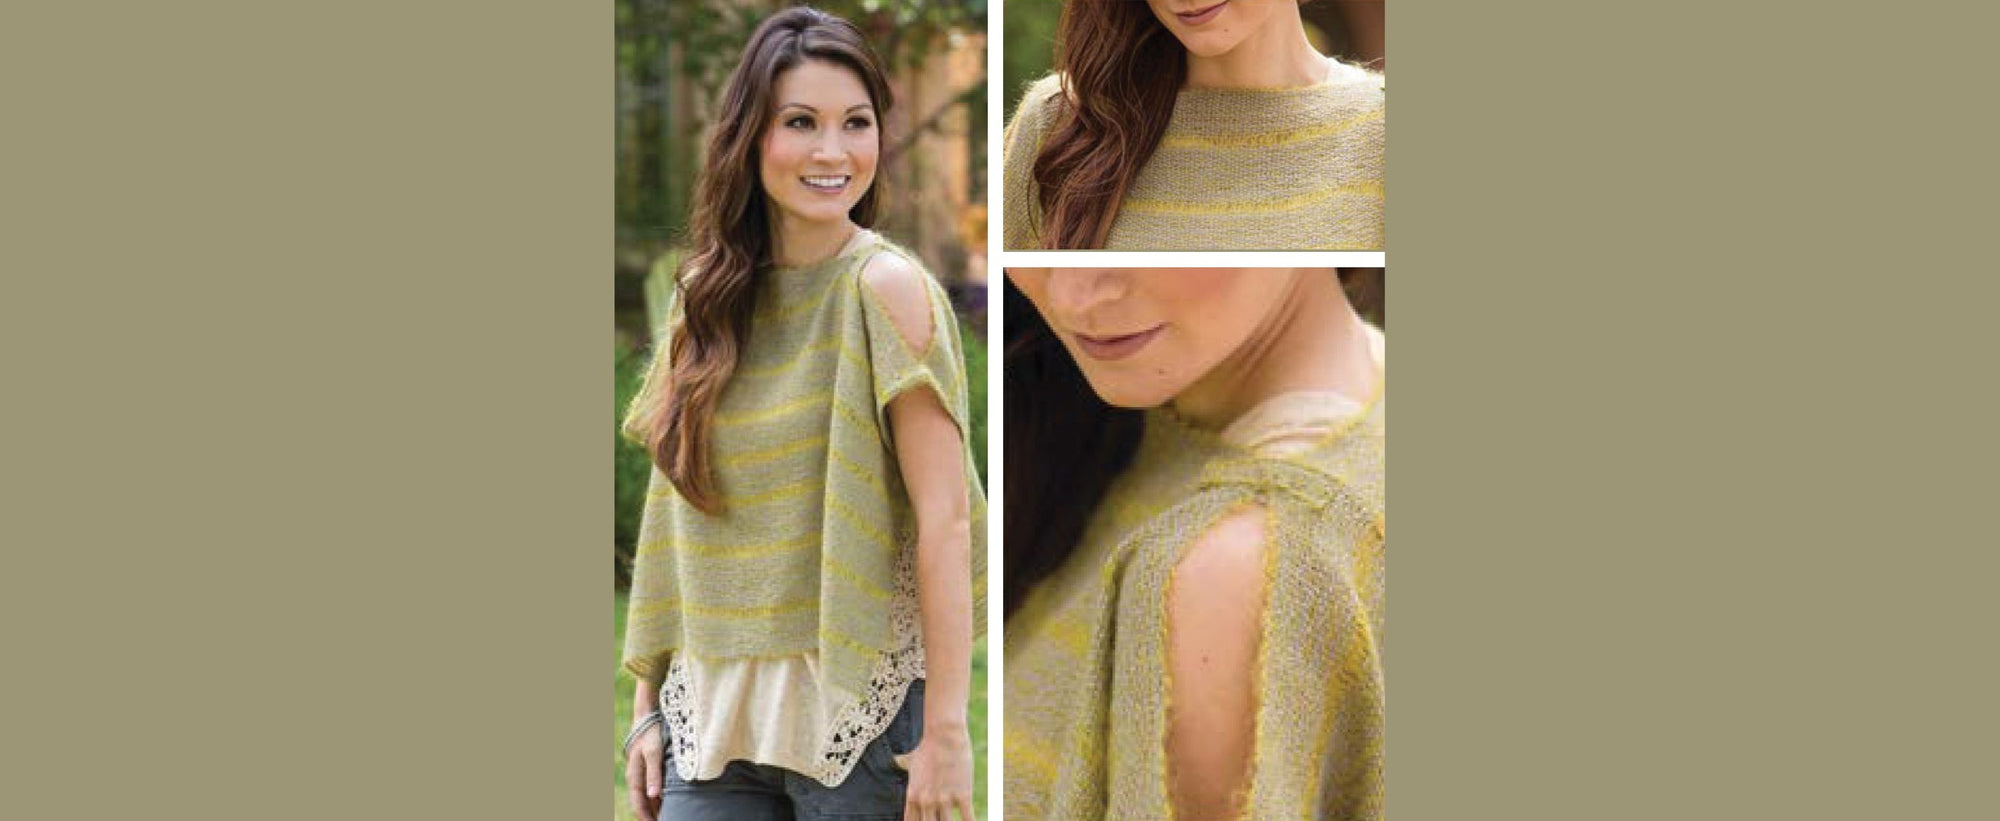
Two rectangles are joined to make this topper that could be dressed up over a long neutral dress or dressed down over a t-shirt and jeans. Either way, it’s easy to make and lovely to wear. A fine alpaca yarn is used for the warp and is crossed with a mohair/silk blend yarn for a fabric that is featherweight light, yet warm.
The stripes are created by skipping dents in the reed. The fabric is then turned in the garment for horizontal stripes. A separate, narrow warp was woven for the joining tabs at the shoulders and sides. These offer detailing to the garment, as well as providing stability at stress points.
Project Details
Garment size: medium
Finished dimensions: 29-1/2” (75 cm) wide x 18” (45.5 cm) deep.
Weave structure: plain weave with spaced warps
Warp length: 2-2/3 yd (2.5 m) which includes 24” (61 cm) for take-up and loom waste. If weaving on a floor loom, allow 36” (91.5 cm) loom waste and increase the warp yardage by a third.
Warp width: 19.5” (49.5 cm)
Total warp ends: 192
EPI: 12
PPI: 7
What You'll Need
-
Warp yarn: Alpaca with a Twist Fino (70% baby alpaca/30% silk at 3,972 yd/lb [3,632 m/453 gr], 875 yd/3.52 oz [800 m/100gr] skein) in color 0098 Silver Belle, 530 yds (485 m) or 1 skein needed for garment and tabs.
-
Weft yarn: Trendsetter Kid Seta (70% mohair/30% silk at 405 yd/lb [370m/453 gr] 230 yd/9.13 oz [210m/259 gr] ball) in #368 Olive, 325 yd (300 m) or 2 balls needed for garment and tabs.
-
shaft loom or rigid heddle loom with 20” (51 cm) weaving width
-
12-dent reed
-
shuttle
-
sewing machine or sewing needle and thread
Materials
Equipment
Directions
Warping, Weaving, and Finishing - Topper Fabric
Warping: Warp according to the warping plan.

Weaving: At the beginning and end of the weaving, weave about 2” (5 cm) with another yarn. This will help maintain the warp spacing. This is waste yarn and will be removed later. Weave in plain weave using mohair. Measure without tension until fabric measures 68” (172.5 cm).
If you do not want to secure the edges on the sewing machine after weaving, hemstitch at both ends of each panel. If hemstitching the ends of the panels, end first panel at 34” (86.5 cm) and hemstitch. Weave a 1” (2.5 cm) spacer and hemstitch again at the beginning of the next panel.
Finishing: Securely roll the fabric up in a thin towel, tie bundle with wool yarn (the wool will shrink in the finishing process and keep the roll tight), and place it in a pillowcase. Wash in the washing machine in hot water on regular cycle with mild soap. Check after 5 minutes and reverse orientation in towel so that inside roll is closest to outside. Full for 5 more minutes. This will help even out the fulling, as the outside felts quicker than the inside (it is harder for the soap and agitation to penetrate to the core of the roll). If the fabric is not fulled enough, repeat for another 2-5 minutes, watching closely.
Warping, Weaving and Prep - Tabs
Warping: Use the same Fino for warp and mohair for weft.
Warp length: 2 yd (1.8 m), which includes 24” (61 cm) for take-up and loom waste. If weaving on a floor loom, allow 36” (91.5 cm) loom waste and increase warp yardage by a third.
Warp width: ¾” (2 cm)
Number of warp ends: 9
EPI: 12
PPI: 7Weaving: Because this is a narrow warp, there will be a tendency for the weft to pack in tightly. Use a light beat. You will need 12 tabs in all (at each attachment point there are 2 tabs, on the inside and one on the outside).
Assembly
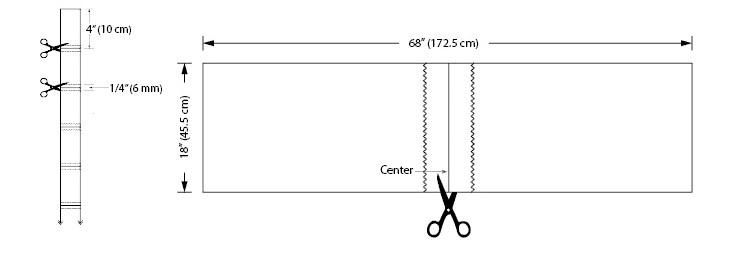
Prepare 12 tabs, each 4” (10 cm) long. Zigzag stitch across on either side of the cutting lines and cut apart (see illustration).
Divide the garment fabric in half and mark ¼” (6 mm) on either side of the cutting centerline. Using a medium-length stitch, zigzag then straight stitch on either side of center line and cut fabric apart, making two pieces. The straight stitch is helpful to stabilize the gaps in the warp.
Hem the ends of both panels by stitching a ¼” (6 mm) double rolled hem by hand or on sewing machine.
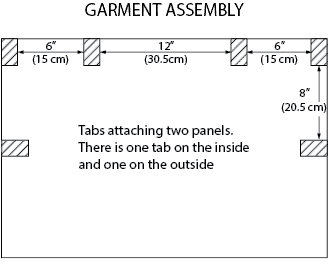
Place the 2 hemmed panels one on top of the other, wrong sides together. Find the center along one of the long edges and mark with a pin. Measure out 6” (15 cm) on either side for a 12" (30.5 cm) neck hole.
To secure the panels together, machine or handsew the tabs on the front and back at the points shown. There will be two tabs at each point, one on the right side and one on the wrong side. Half of each tab will be on one panel and half on the other. Pin in place. Fold the raw edges under 1/4” (6 mm) and hand stitch or sew by machine to secure.
Place tabs in these places:
1. 6” (15 cm) mark from either side of center (for neck hole).
2. At either side of the shoulder (at either end of the fabric edge).
3. Along either side, 8” (20 cm) from the top shoulder edge.


