Reading Weaving Drafts & Pants for Baby
By Melissa Ludden Hankens
While this article is mainly about how to read a draft, I'm also going to share my experience boiling Foxfibre Colorganic cotton to develop the color in the cloth I wove to make my almost one-year-old an easy pair of pull-on pants.
When I first learned to weave, I remember thinking that reading drafts was rather intimidating, and how on earth was I ever going to remember what to treadle when or if I ever managed to get my loom threaded and tied up properly. I have since found that all it really takes to understand a draft is a moment of peace and quiet so that I can focus.
If you own a shaft loom, such as Schacht's Table Loom or Baby Wolf, being able to read a draft is helpful should you wish to weave patterns beyond plain weave or basic twill.
There are many resources out there. A few of my favorites include The Handweaver's Pattern Directory by Anne Dixon, Mastering Weave Structures by Sharon Alderman, and of course The Weaver's Idea Book by Jane Patrick, which has the benefit of being written for both rigid heddle and shaft loom weavers. You may have also heard of A Handweaver's Pattern Book by Marguerite Porter Davison, commonly referred to as "the green book." Most weavers I know have this gem in their weaving library, and it is most useful to own.
So how do you go about using these books? How do you read the drafts? Have no fear! It is less intimidating than it might initially seem.
Project Specs
Weave structure: 6-thread herringbone
Total warp length: 3 yards (this is more fabric than you will need for a single pair of pants for a baby, but I have a few other side projects that I'm planning with the extra fabric)
Number of ends: 630
Width in reed: 21"
EPI: 30
PPI: 24
What You'll Need
-
Warp yarn: 1,802 yards of Foxfibre Colorganic 10/2 cotton in 50/50 green/white, from vreseis.com or cottonclouds.com
-
Weft yarn: 1,165 yards of Foxfibre Colorganic 10/2 cotton in 75/25 brown/green
-
½” elastic
-
sewing thread
-
weaving draft
-
4-shaft loom with at least 21" weaving width
Materials
Equipment
Directions
Reading a Weaving Draft
I break a draft down into four parts – threading, tie-up, treadling, and drawdown. Additionally, some drafts will also have a color component, as many of the drafts in the Dixon book and Jane's book do, indicating how to combine colors to achieve a particular outcome.
In the U.S., drafts are generally laid out with the threading running across the top and the treadling running vertically along the right edge. The corner where these two grids intersect is the tie-up. The area showing what your fabric will look like is the drawdown.
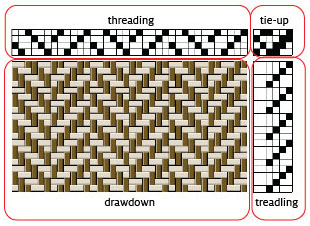
Let's start with threading. The threading section tells you how to thread your warp ends through which shaft and in which order. Threading is read in the opposite direction we English readers are typically used to. That is, it starts at the right and is read to the left. Put another way, we read "once upon a time" and we thread "time a upon once".
If you look at a draft, you should see a series of horizontal lines at the top, as in the Davison book and Jane's book, or a grid similar to graph paper, as in the Dixon book. Moving from the bottom line up, the spaces between two horizontal lines are your shafts as you are facing the loom. So the bottom space is shaft one, the second space above this is shaft two and so on.
It is important to understand how many shafts you need to weave a particular pattern. For this article, I have chosen a modified twill called the "Six Thread Herringbone" on page 25 of the Davison book. This draft uses four shafts, as do all of the patterns in the book. If you are looking at a different draft, check to see how many horizontal spaces there are to know how many shafts you will need to weave the pattern.
The next part of your threading involves the marks you will see within the horizontal spaces. In the Davison book, these marks look like a simple number one. In the Dixon book, she uses a grid and fills in squares to indicate where to thread. In both cases, you read the marks from the right to the left.
Often you will see vertical lines intersecting the horizontal lines creating groups of threading marks. If you look above a given section, it may say, "repeat" or show a curved, arrow. This simply indicates that the section should be threaded a given number of times.
If we return to the example of the six thread herringbone, the threading sequence is as follows: 4-3-2-1-4-3-1-2-3-4-1-2, with each number indicating the shaft that the warp thread should be threaded through in sequence, and the sequence being repeated in full across your warp. This particular draft, as with many types of twill, should be threaded such that you finish at the end of the threading sequence, not the middle, or you risk not catching your last warp thread as you weave.
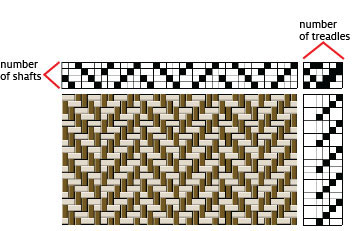
Once you have threaded your loom, you will need to tie up your pattern. Both the Dixon and Davison books often give you multiple tie-up and treadling options to create pattern variations using the same threading. I like how you can see in the drawdown samples of how each combination can alter the fabric.
The six thread herringbone threading offers two pattern options. I opted for the first, indicated by a Roman numeral I (one), if you are looking at the book, as I was hoping to create what I felt was a more traditional herringbone fabric.
Now here is where the Davison book is a bit different from the Dixon book. The Davison drafts are written for sinking shed looms. The Dixon book is written for rising shed looms, like Schacht's table loom and the Baby Wolf. With a rising shed loom, when the treadle is depressed, the shaft rises. With a sinking shed loom, you guessed it; the shaft is lowered when the treadle is depressed.
What does this mean for you if you are using a rising shed loom and want to create a pattern using the Davison book? Take a look at the tie-up grid. If you are using the Davison book, you will want to tie up (raise) the shafts that correspond to the empty spaces rather than the spaces with an "x". Simple as that! So the tie-up for my six thread herringbone is treadle a: shafts 2 and 3, treadle b: shafts 3 and 4, treadle c: shafts 1 and 4, and treadle d: shafts 1 and 2. If you were using a table loom, the corresponding levers would be pulled together.
How to treadle a particular pattern is as easy as reading the marks to see which combination of shafts is lifted when that mark is indicated. For my six thread herringbone, the treadling following the marks from the top down is treadle d, then c, then b, then a, repeated. I like to treadle back and forth from my left foot to my right foot as it creates a nice rhythm when I weave, so I would tie up treadle a and c on the left-hand treadles and b and d on the right-hand treadles of my Baby Wolf.
All together now!
Baby Pants Project
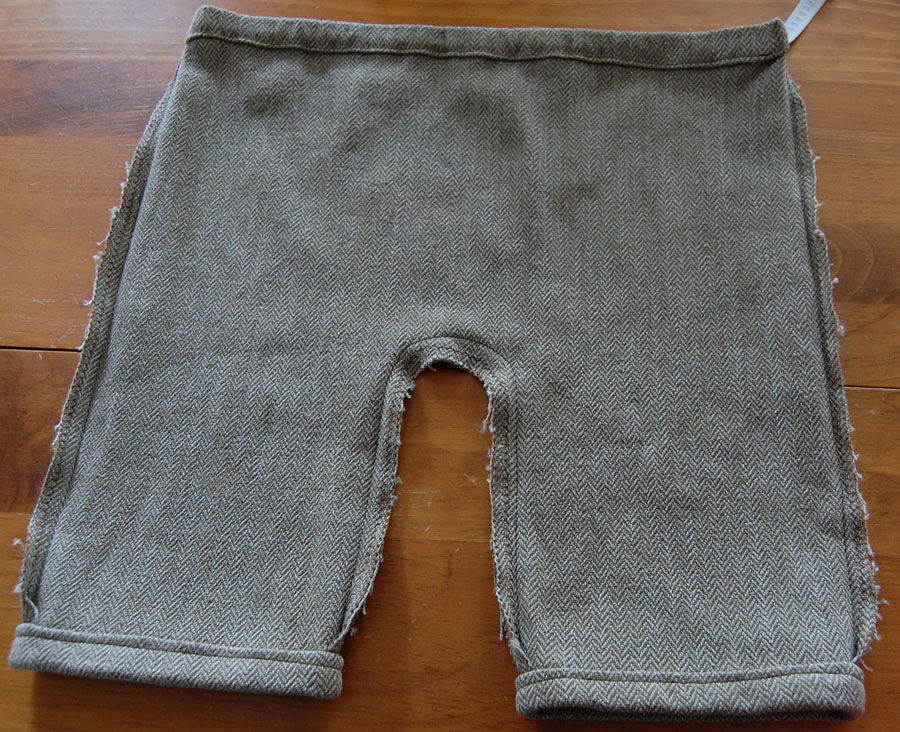
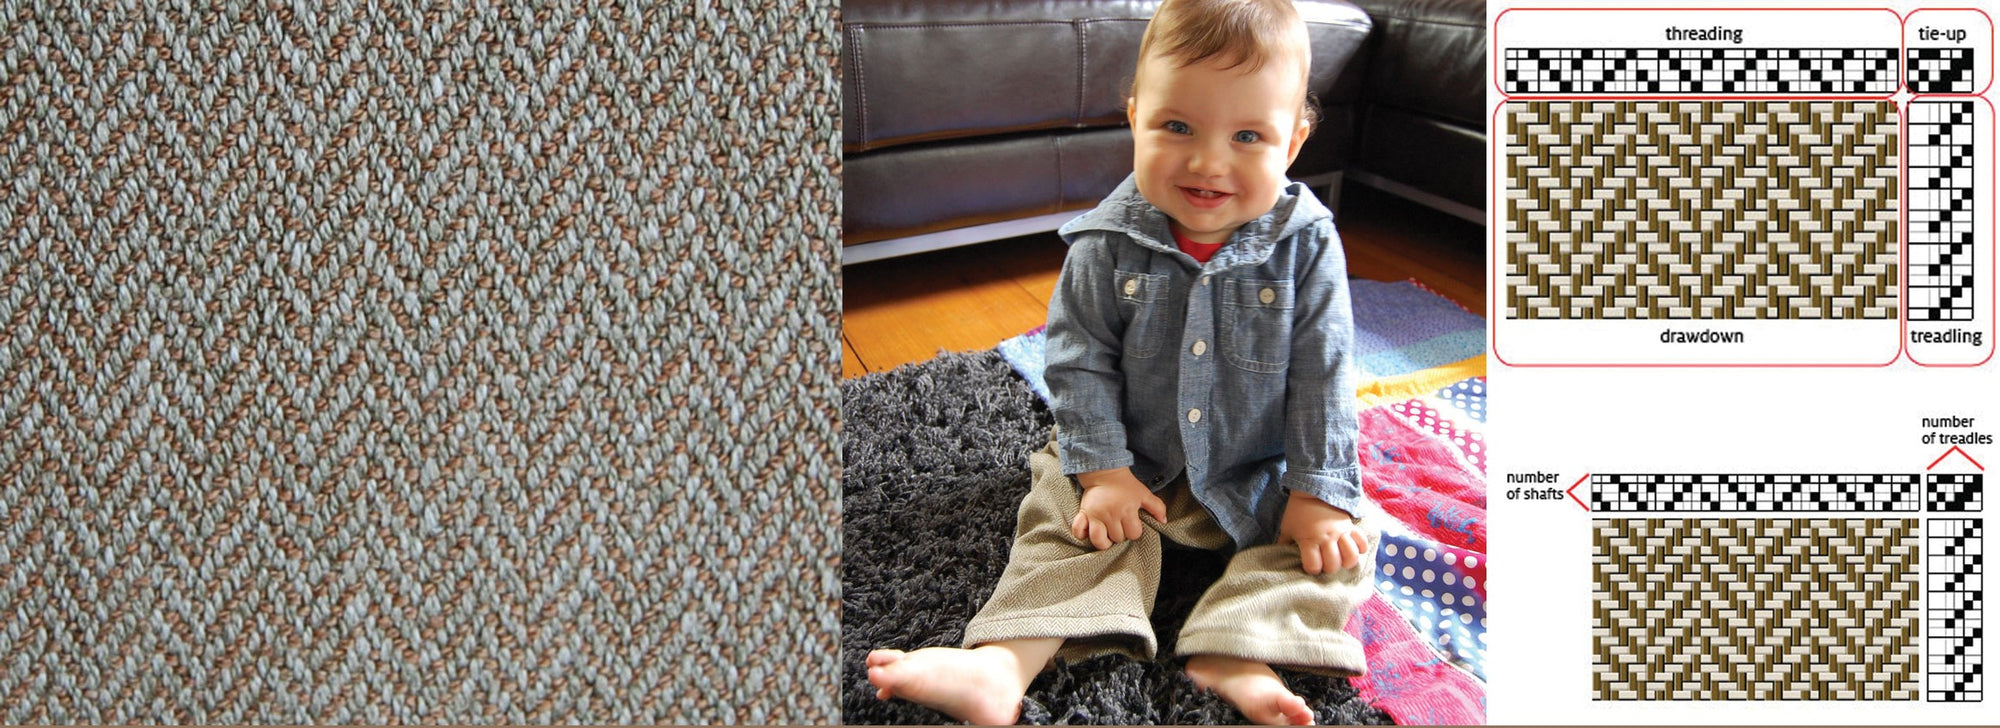
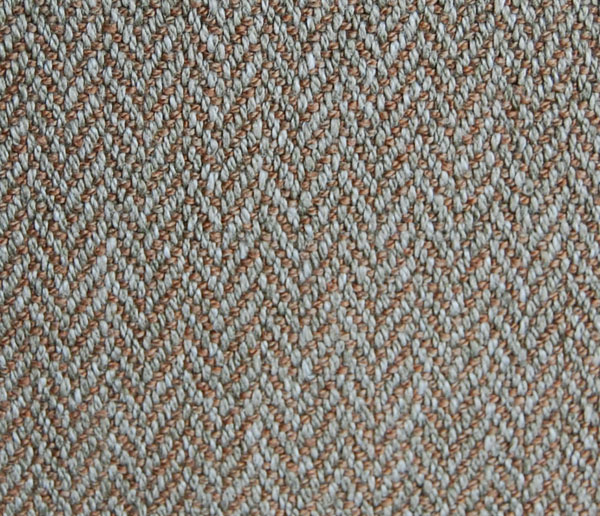
I wove three yards of fabric in the six thread herringbone on page 25 of Marguerite Porter Davison's book, "A Handweaver's Pattern Book". I wanted to make a simple pair of pull-on pants for my almost one-year-old son. I love working with Foxfibre Colorganic cotton. The resulting fabric is beautiful, soft and durable.
I used Foxfibre Colorganic 10/2 cotton for this project, but any 10/2 cotton would make a fabric that is lightweight but durable. Thank you to Margaret Russell, contributor to Wild Fibers Magazine, for pointing out an excellent article in the Winter 2009/2010 issue, "Never Say Dye" for a fascinating article about Sally Fox and her cotton.
I had read on Sally's website, vreseis.com, that subjecting the cotton to hot water would develop the color of the yarn. I had always wondered why my tan cone of yarn was labeled as green, so I decided to boil the fabric to see what happened. I filled our lobster pot with water and tossed in some baking soda, per her instructions. In went all three yards of material. At first, the water beaded right off of the surface of the fabric. It took quite a bit of poking and prodding to convince it to stay under water. The fabric simmered for about an hour, and I couldn't believe the difference in color when it came out. I had the additional benefit of knowing that that the fabric probably couldn't shrink any more -- handy when you are making clothing for a little person. Also, it was a fun science experiment.
The pattern I used was "Simple Pants" from Simple Sewing for Baby by Lotta Jansdotter, but you could make your own by laying out a pair of pants, measuring the waist width, the leg length and adding seam allowances. Check your local library for pattern books, or do a quick search online for free patterns.
Two other books I would recommend are Fashions from the Loom by Betty Beard, which has a fun pattern for "Evening Trousers," and Weaving You Can Wear by one of my favorite weaving authors Jean Wilson with Jan Burhen, which has an interesting pattern for "North African Man's Pants." Both of these patterns involve little to no cutting if you weave fabric of the appropriate width, and would be easy to create even if your sewing skills are very basic.
I should also point out that while both books might look a bit dated, they give fabulous examples of how easy it is to fashion clothing using simple shapes. The pattern I used has you cut two rectangles with a "U" cut out to form the pant legs.
To create the pants, I cut out my pattern pieces and then, using my walking foot, zigzag-stitched around the edge of each piece to keep the cut edges from fraying. The pieces were then sewn together, right sides facing each other. The hem at each leg opening I folded up ½", pressed, then folded another ½" to enclose the cut edge. I machine-stitched the hem in place. From there, I folded the waist seam down ½" and pressed, then folded it over one more time about ¾" and machine-stitched to create a casing, leaving a 2" opening.
Using ½" elastic, I attached a safety pin to the end of the elastic and fished it through the casing at the waist. The pants were then placed on my squirmy baby model so that I could cinch the elastic to fit. I hand stitched the ends of the elastic together, leaving a 2" tail so that I could let the waist out when Benjamin grows a bit , then hand stitched the opening closed. Some people may poo-poo the idea of machine stitching handwoven cloth, but I find it both practical and helpful, not to mention time-saving.
