Summer Cotton Spinning
By Stephanie Flynn Sokolov
Inspiration surfaces in so many ways. Sharing a room with over 280 people with a passion for fiber and weaving is bound to spark some new ideas. This May Colorado Weaver Day took place in Golden and featured a variety of speakers and topics. I brought my Schacht Sidekick spinning wheel hoping to get a chance to spend some time spinning. Searching the auditorium I found the perfect spot off to the side in the front row. My wheel and I settled in.
After the first speaker and 4 ounces of Baby Teeswater, I knew it was going to be a productive day. Between speakers, a couple people that were not yet spinners stopped by to talk animals, fibers and wheels. After the second speaker and 3 ounces of hand dyed Corriedale, I was approached by a couple of ladies visiting from the West Coast. During the conversation on what I have been spinning and how I approach it, both women, new spinners, mentioned that the first fiber they spun was cotton. This surprised me—maybe because animal fiber is highly accessible and cotton has always been a smaller piece of my spinning pie.
Within the last year I started to spin cotton straight off the seed and loved it. With no prep, it is most appealing for a lazy spinner such as myself. I laugh as I write this because I spend a lot of time of prepping fiber and am not really lazy, but when nature has created this beautiful fiber that is ready to spin when picked, I jump at the chance to skip the prep.
The next spark of inspiration came at lunch when I sat next to Irene Schmoller from Cotton Clouds. We started talking and I told her that I really wanted to write the next article on cotton. Interesting conversation ensued about cotton misconceptions, spinning techniques, and the new innovations being made in cotton, including a variety ready for dye. Since I love to work with color and don't care for dying cotton, this was quite interesting, even right up my alley, until wait,
"Irene, did you just say that you have cotton dyed by Nancy Finn from Chasing Rainbows?" Oh, my.
Not only is that exactly what she said, but it is Supima cotton, with a long staple length, and it is carded not combed. Great if you are not familiar with cotton. Sign me up and put it in the basket. A couple days later, look what arrived in my mailbox. An ounce of cotton in "Rainbow".

For Mother's Day my little ones gave me a new iPod Nano. I already had the weaving project in mind. As you may already know from previous articles, I listen to audio books while I work. This slick little device can clip onto a watchband and double as a watch. I often have to answer the question, "What does a fiber artist do all day?" Spinning and weaving projects that I use everyday helps answer this question with a visual explanation and is helpful since it is beyond the general population's understanding of how and where cloth is made.
It reminds me of trying to explain 'where babies come from'; you must use simple words and only answer the question that is asked or you may go too far and receive a glazed-over or even scared look. Luckily spinning cotton is fairly straightforward and will lend itself well to this bracelet project that is both beautiful and functional.
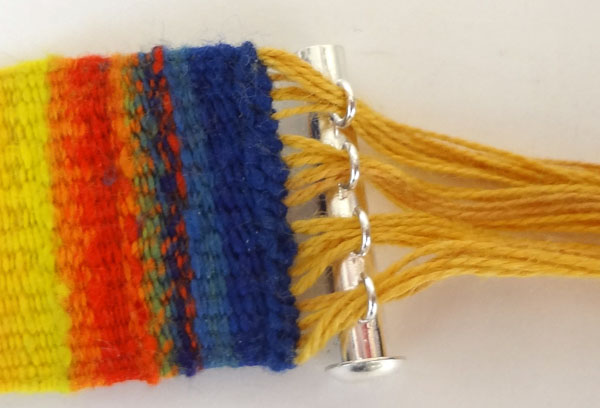
I ordered the Rainbow color since it looked like it had a bit of all the colors I might want, and with all the primaries I could card if I wanted to achieve even more color variations. For this project, since I was spinning to weave a bracelet for my Nano, I thought I would let my six-year-old son decide on the colors. He told me it needed to be bright yellow for the summer. As you will see, I spun and wove this one first and followed it up with a purpley midnight blue with some sparkle that was a little more my style.
What You'll Need
- ½ oz dyed Supima cotton (CottonClouds.com)
-
a bit of sparkly Mylar
-
18 yards 10/2 mercerized cotton
- 2 multistrand tube clasps
-
rigid heddle loom
-
12 dent reed
-
stick shuttle
-
fork or tapestry beater
Materials—makes 2 bracelets
Equipment
Directions
Spinning
Cotton unlike some animal fibers doesn't compact or felt when dyed. This is very helpful when buying your cotton from an online store. It arrives ready to spin, no fluffing or pre-drafting necessary. You want to keep the fibers compact so they stay together when drafting. I did pull the cotton apart at the color changes to keep the colors where I wanted.
To start spinning, you can use a very simple join. Fluff out the ends of the cotton you are starting with and hold them at a 90-degree angle to your leader. Start the wheel spinning in a clockwise direction for a Z twist. Barely touch the cotton fibers to the leader and when the cotton fibers start to join with the leader, gently move your hand holding the cotton down towards your body. You can use your hand closest to the wheel to gently add and subtract twist for a smooth join. Hold your hands slightly farther apart than the staple length, which is about two inches.
Cotton doesn't have scales or crimp like animal fibers and requires more twist to hold its structure. To achieve this you will want to put the smallest pulley (whorl) on your wheel. This will give you more twist each time you treadle. Your forward hand is very important in this kind of short forward draw drafting technique. My forward hand deftly rolls and unrolls the fiber as the twist is being introduced into the fiber. This will ensure a better control over the number of fibers being drafted at one time and lead to a more consistent yarn. If you are starting to glaze over at this point, never fear. Remember you are doing this because it is fun!
I should point out the great thing about this project. I used a commercial yarn for the warp. The bracelet is a weft-faced weave packed tightly and the yarn doesn't need to look commercially spun. What fun would it be to try to produce something that looks like it was machine made?
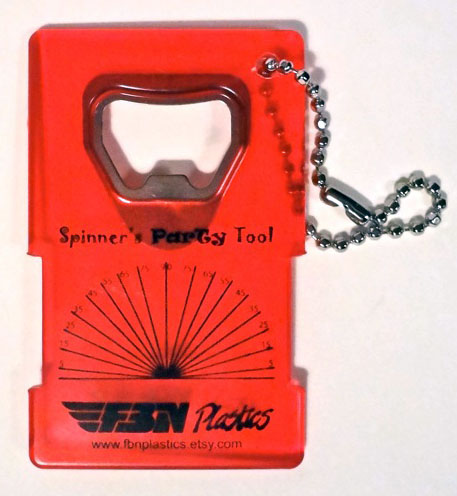
After you have warmed up to the cotton and are feeling friendly, you can stop to check your twist and wpi (wraps per inch). I spun at approximately 9 twists per inch and 44 wpi. You can stop spinning and let the yarn twist back on itself, count the number of bumps on the top or bottom of the yarn in one inch for your twists per inch. Check out the new device I received as a gift to measure twist angle and wraps per inch, plus bottle opener, essential for every spinner.

After this pit stop you can adjust your wheel if necessary. Too much twist? Try increasing the draw-in tension or treadle slower. Increasing your tension will most likely also increase your yarn's diameter. Too little twist? If you are on your smallest pulley you may need to decrease your draw-in tension, or treadle faster. Decreasing your draw-in tension will likely decrease the diameter of your yarn. This is the fun balance.
If you are a spinner that says, phooey, just do what you do and spin the yarn so it will hold together while weaving. I spun ¼ ounce for each bracelet and had some left over. I did not measure the number of yards because I left the yarn on the bobbin and on the wheel to give me some tension while winding the shuttle.
When I spun for the second bracelet, I decided to spin purple and blue like the summer night sky with some Mylar for stars. To add the Mylar, I simply held it together with the cotton at random intervals and let it wrap around and almost tangle in the cotton. Once this bracelet was woven and finished I trimmed the Mylar so it wouldn't be itchy on my skin.
Weaving
Warp your loom at 12 epi with 1 yard warp and 18 ends centered in the reed. This will allow you to make two bracelets and have 20" loom waste.
Start weaving and hem stitch. Continue weaving in plain weave, packing the weft tightly over the warp so none is exposed. Weave until the bracelet measures ½" larger than your actual wrist measurement and hemstitch. Take off the loom and tie onto clasp. Trim ends and wear. Warning: This project is fast and addictive.
I found that using my belt shuttle with a beveled edge on one side helped me to pack the weft very tightly. The 12 dent reed on my Cricket loom didn't pack it as tightly as I desired. The very tight weft gives this bracelet a lot of structure to accommodate my Nano.
My first bracelet was a success, but I felt I could improve. Initially I just grabbed what I had handy and close in color to my weft, it happened to be SWTC Infinity Soysilk 16/2. This was a bit too fine, so I doubled it. This worked, but I didn't care for tying extra ends to the clasp. I also wove this bracelet only 1/4" bigger than my wrist and when I attach the Nano it is a little tight.
Finishing
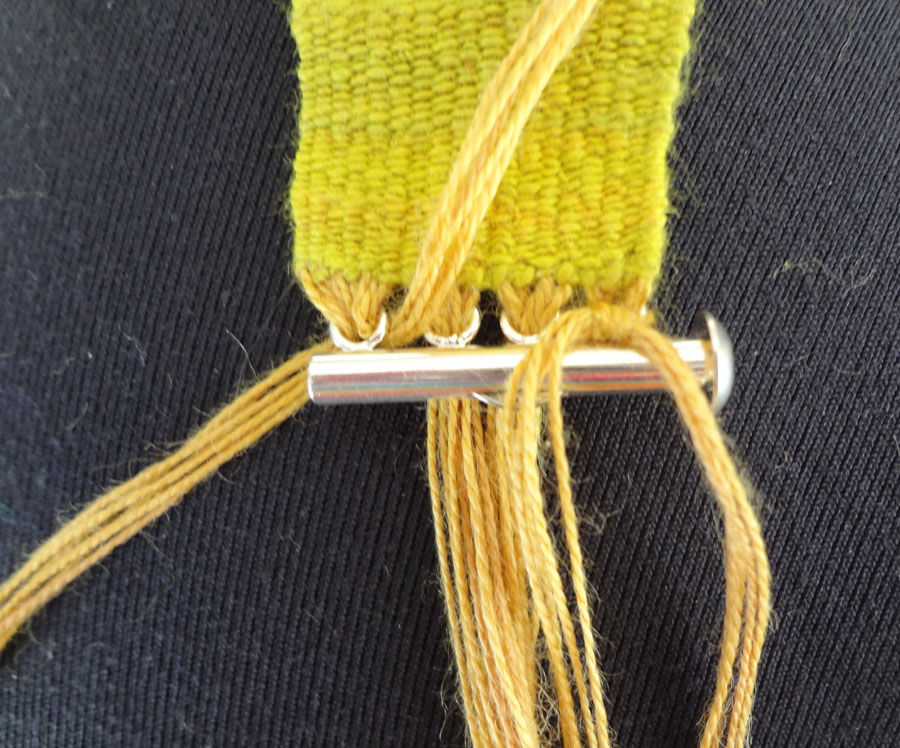
To add the clasp, divide the warp ends and insert into the rings on the clasp.

Tie onto the clasp and trim.


