The Mini Loom Takes A Trip
Designed by Jane Patrick
If you've been trawling Pinterest, then you know that it’s back to the 70s. At least, if you were weaving in the 70s like I was. Little tapestry wall hangings with lots of texture and fringe that are reminiscent of what we were weaving are everywhere. Even Oprah magazine featured a weaver making these little textured hangings. The difference between then and now is that this time around the colors are brighter, lighter, more fun. Oh, and even macrame is back; fat, thick yarns worked over thick sticks. Really, I never thought we’d go there again. But that just goes to show you that what was old is always new again.
This little wall hanging, just 6” x 11”, is perfect for trying out ideas, learning techniques, and escaping from wintry ice and snow (whether it’s a fantasy trip or a real one). Cheerful colors call out for warmer climes and sunshine and working with them made me feel light of spirit.

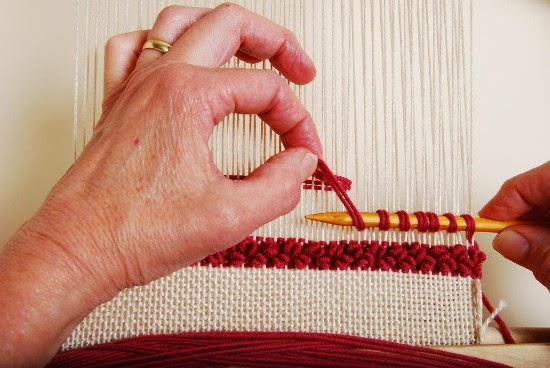
I used the Schacht Mini Loom for this project. At about 8” square, it is small enough to pop into your carry-on (or your project bag if this is a stay-cation). The Mini Loom comes with a little hand beater, 2 shuttles and a weaving needle—which you’ll need as you get closer to the top edge. I also used a knitting needle as a shed stick which I wove over, under, over, under, leaving it in place--which makes weaving across in one shed super easy and the alternate shed easy to pick (you'll see the knitting needle in the photo below).
For warp yarn, I took a trip to the hardware store and bought a ball of #24 cotton cable cord. I like this cord because it is a chunky size and sets well at 7 ½ epi on the Mini Loom. You could use most any sturdy, thick string, though. I warped the loom the full width and after winding it on, tightened each warp thread by taking up the slack starting at one side of the loom and working to the other.
For yarns, I used some thrums and leftover bits from my stash. Since this doesn't take a lot of yarn, you’ll find that little hangings are the perfect use of these yarns.
What You'll Need
-
White background: white worsted weight yarn, such as Brown Sheep Lamb’s Pride. Bottom fringe: Worsted weight yarn in three colors, two shades of each. White loops: Two white sport weight yarns, one wool and one cotton. Blue bumps: a bit of blue wool top. Pink tufts: The same two pink yarns used for the bottom fringe.
-
Mini Loom or other small frame loom like an Easel Weaver or Lilli Loom
Yarns
Equipment
Directions
Weaving
- Weave 4 rows of background yarn, packing it in very tightly to cover the warp.
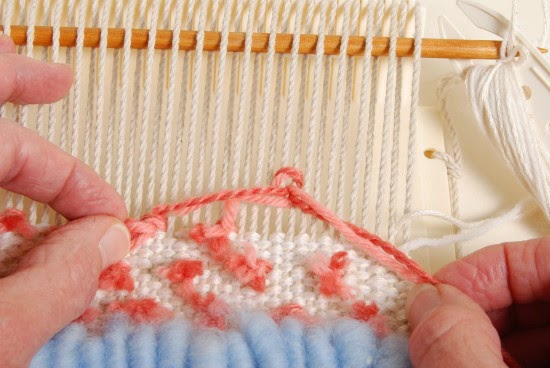
- Make a row of ghiordes knots (directions below), leaving a 4” fringe. Using two yarns as one, make a green knot, then a blue knot, and then a pink knot. Repeat in this order all the way across the warp.
- Weave 2 rows with background weft.
- Make another row of ghiordes knots as you did in step 2.
- Weave 4 rows of background.
- Make a row of picked-up loops using two yarns as one (instructions below).
- Repeat steps 5 and 6 five times, ending with another 4 rows of background.
- Using wool top, make a row of loops, pulling them up to about ½” for a raised line.
- Weave 6 rows of background.
- Using two pink ends as one, make a row of ghiordes knots (instructions below). Start working over the 3rd and 4th warp threads, skip warps 5, 6, 7, 8 and make a knot over warp threads 9 and 10. Repeat in this fashion to the other side.
- Weave 7 rows of background.
- Make another row of ghiordes knots as before, but this time start the first knot over warps 6 and 7, skip 4 warp threads and then work the next knot. This will stagger the knots to make an alternating dot pattern.
- Repeat steps 10-12 two more times and end with step 10.
- Finish weaving with the background weft all the way to the top edge. As you get closer to the top, you’ll find that it is impossible to use the shuttle and you’ll need to change to the weaving needle.
- When you can’t weave any further, remove the weaving from the loom. I found that there was a little space at either end of the weaving. I filled this by needle weaving two more rows of background to close up the space.
- To finish, trim all pink ghiordes knot dots to ½”, trim bottom fringe so that it is even and about 4” long. Fold down the top of your hanging ½” to the back side and stitch down to make a hem.
- Enjoy.
How to make a ghiordes knot using a continuous length of yarn
- Insert the end of yarn between two warps (from top to bottom).
- Bring the end out to the right of the two warps.

- Travel over the top of the two warps to the left.
- Bring the end up through the middle of the two warps.
- Pull down the ends to tighten and trim off end.
- Repeat.
How to make picked-up loops
- Weave across with the loop yarn (if you are right handed it is easiest to weave from right to left).
- Using a knitting knitting needle or your fingers and working from your dominant side, draw a loop up and place it over the needle (the size of the needle determines the size of the loop). Pull up loops between all of the warps or just some of them. This can be very flexible.

- Carefully remove the knitting needle and press down on the loops with a beater.
- Weave at least 2 rows of background and beat it in well to further secure the loops. Note: since the loops are not tied, they can be pulled out, so beating them well into place helps prevent them from pulling out.

