Recessionista Rag Mats
By Jane Patrick
Sometimes it feels good to use what’s on hand. For warp I used the reliably sturdy and thrifty cotton carpet warp in a variety of colors, and for weft I combined fabrics left over from a rug I’d woven as well as other miscellaneous fabric bits in my “rag bag”. It was a fun challenge to combine what was readily at hand to create something useful. Though the same technique is used throughout, I purposely altered each mat for similar-but-different mats—part of the fun of weaving your own.
Project Specs
Finished size: 12” wide x 18" long
Weave structure: plain weave
Warp length: 3½ yds
Total warp ends: 140, including floating selvedges
Width in reed: 14”
EPI: 10
PPI: 11-12 for body of mat; 18 for hems
What You'll Need
-
Warp: 8/4 cotton carpet warp at 1680 yd/lb in a variety of colors. I used light, medium and dark greens, and red and yellow. You’ll need 3½ yards for four mats, which allows 28” loom waste.
-
Weft: Cotton fabric cut into ½” strips (you’ll need 35 yards of ½” strips used double for each mat (140 yards for four mats) and 8/2 cotton carpet warp, about 70 yards for each mat (280 yards for four mats).
-
4-shaft loom with at least 14” weaving width
Materials
Equipment
Directions
Making the Mats
Warping: Warp the loom for plain weave, with floating selvedges.
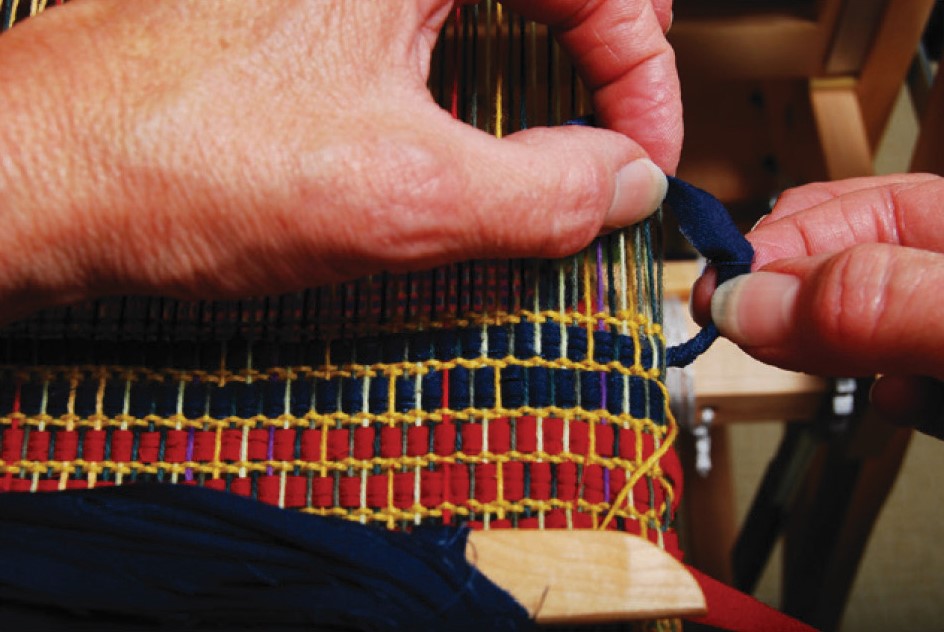
Weaving: Weave 1½” with cotton carpet warp at the beginning and end of each mat for hems. For the body of the mat, I alternated two picks of carpet warp with one pick of rags throughout. Borders, also alternating two picks of cotton carpet warp and one pick of rag, are woven with 5 rows of gold rags and 3 rows of red rags. I chose blue rags for my main color and inserted accents of orange, green, and gold in no particular pattern. The overall woven length of each mat is 18”, excluding hems. The borders are 2¼” and the body is 12½”, measured off tension. Each mat uses a different color of carpet warp for weft. I used red, gold, purple, and green.
Finishing: I secured the warp ends with knots and then hand washed the fabric length in hot soapy water. After rinsing the fabric well and laying it flat to dry, I steam pressed, cut off all of the rag tails and ran a zigzag stitch between all the mats before cutting them apart.
Make a double hem by folding the hem twice to meet the edge of the rags. Press the hem well and then machine stitch just along the edge of the hem. If you are careful to match your sewing thread, the stitching is almost invisible.
Working With Rags
- I love using fabric strips for weaving. I like the little bits of threads that poke out of the weaving. I like the slight inconsistency in the surface of the fabric. I like how a print fabric shows its different surfaces. And, I like the way rags make a sturdy fabric, whether for table or floor! Here are some of my tips for working with rags.
- I use a rotary cutter, self-healing mat and T-square to cut strips. If you don’t have this equipment, it’s worth the investment. You’ll find all kinds of uses for the rotary cutter—and it makes fabric cutting a snap. Do be careful, the blade is super sharp.
- Two strips pack in better than a single strip of the same size. This means more rag cutting, but I gotta tell ya, the end result is so much better. Not only does the weave pack in tighter, but the selvedges look better too.
- I join the strips together by overlapping them about 3/8” and glue them together with a tiny dab of glue stick. It doesn’t take much— you only need the strips to stay glued together as long as it takes to weave them.
- For doubling strips, I work on two strips at a time and then wind them together on a stick or ski shuttle—this way my two strips end up the same length.
- To really get the strips well packed in, it is helpful to change sheds before beating, and use a firm beat. For rigid heddle weavers, you may find it nec essary to hand beat with a weighted beater every few rows in order to get the rags packed in well.
- I like to separate strips of rags with a smaller yarn. For these mats, I followed each rag pick with two picks of cotton carpet warp.
- To make tidy selvedges, I twist the fabric strips at the
selvedges before inserting the shuttle into the shed. Again, this adds time to
your weaving, but it really, really improves the look of your edges.

- Prints are really fun to play with because they generally have a right and wrong side that adds a lovely color and texture variation to the surface of your fabric.

