By Stephanie Flynn Sokolov
Trends come and go in all aspects of our lives. I find it especially true in spinning and weaving. If you look back through ten or more years of spinning and weaving books and magazines, you’ll find that ponchos and spinning in the raw have had their day. Color seems to be the trendy parade of the day and I am jumping on the bandwagon. I love color. Although I don’t wear a lot of color and tend to subscribe to the architect schema of subdued shirts and skirts with a shock of color in my jewelry or accessories, I do love to work with it, and even more, manipulate it.
In preschool, I fondly remember the teachers bringing out three large pitchers of red, blue and yellow water dyed with food coloring that we were allowed to experiment with. Although I continued to explore colors in paints, pencils and markers, I didn’t really get excited about color in my fiber adventures until I took a class from Deb Menz. As a fiber artist, I highly recommend both her excellent color books, Color in Spinning and Color Works.
Like my preschool teachers, Deb Menz brought out the primary colors, though this time we used hand cards and drum carders for our mixing experiments. Once we were done prepping the fiber, the real fun began, the spinning. I am not always the best student when it comes to taking notes, so I thought I would show you how I do it when I do. I buy perforated print-your-own business card stock, and the plastic sleeves to hold business cards. I place small little bits of the colors I’m blending on the front of the card and then wrap any spinning samples around the edge, keeping notes on the back.

One of the newest books in my library is Craft Bomb Your Bike by Shara Ballard. I have slowly but surely begun to bomb my house, so of course my new bike is the next one to get it. The first part of the bike to “get it” is the front basket. I have decided to make it look like a window box. Now I need flowers. Enter the next book, Knitted Flowers by Nicky Epstein. I like flowers to look real with realistic colors so I really need to spin my own yarn, don’t you think? Since the largest population of flowers in my garden is echinacea, I decided to start there.
One of the biggest parts to working with color is the sciency part, guesstimating the outcome of mixing colors. Color wheel, front and center please. Although I have worked with color for most of my life, my introduction to the color wheel is relatively recent. I thought it was a cheat and that you only needed one if you were an amateur (that, of course, was not me). So I admit that I grew up a little and played around with a color wheel in a workshop and learned a lot.

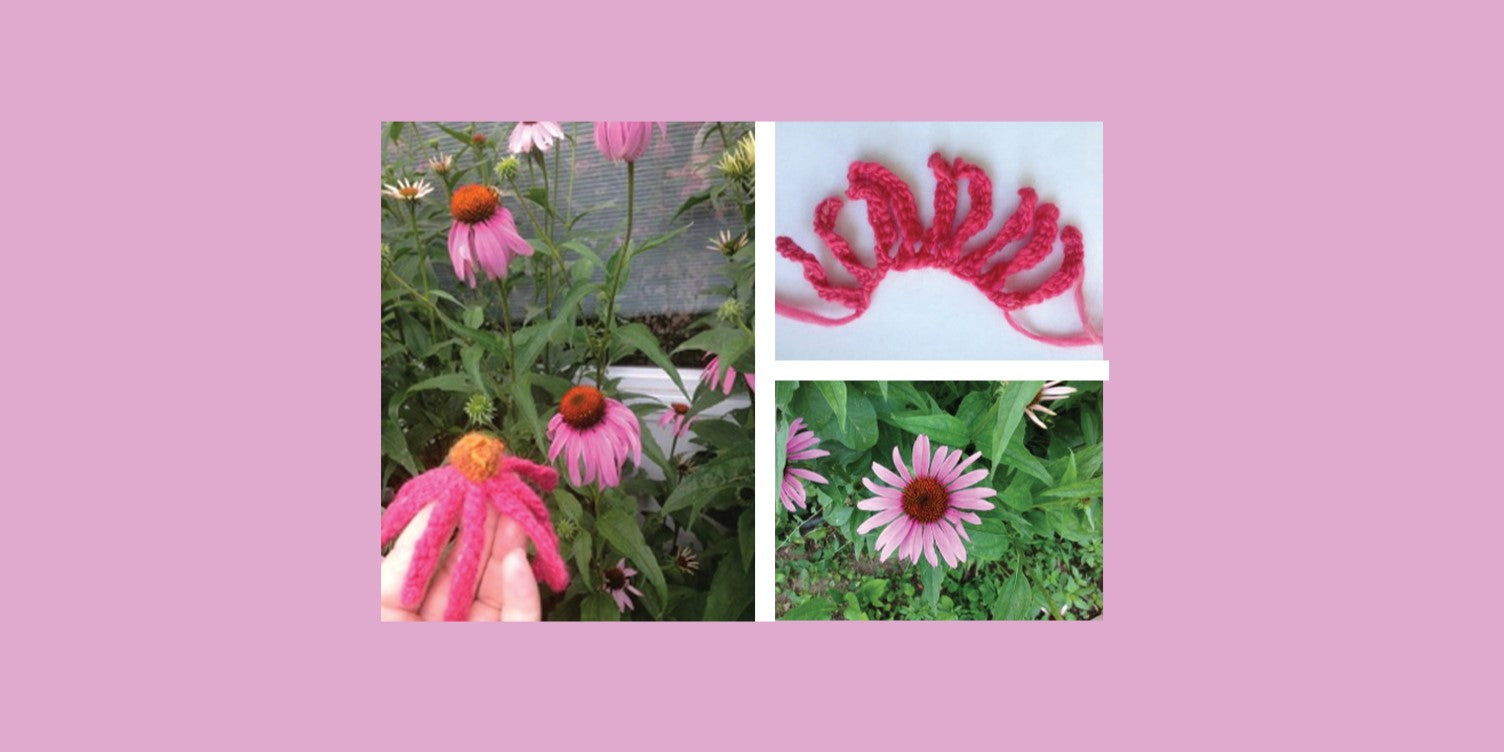
To replicate the echinacea in my garden, I first took a picture of them.

I opened up a box of stash fiber containing the many colors I needed to copy my flower. I started with the color that was closest to the main color of the flower, charged the hand cards with a light layer of this color, then I took a closer look to see what other colors were present in the flower. I used my color wheel to add a little dabble on top of the main color, carding them together until I arrived at my desired color. (Don’t forget to keep a little wisp of all the colors that you used for future reference.)
Upon inspecting the flower’s center closely, I discovered dark brown and red I hadn’t seen at first. When adding these on to the card, I made sure to leave them stripey and not blend them too much so the tiny stripes would act as highlights after the yarn was spun. I spun the yarn at 15 wraps per inch (wpi) and did not wash it before knitting.

To make the flower, I used double pointed needles (DPN) and cast on 14 stitches (sts) with a knitted cast-on. Bind off those 14 sts leaving the last loop on the right needle. Switch the needle to your left hand and cast on 14 sts again and bind them off. Continue until you have 9 tendrils. With a darning needle, insert the tail of the yarn into the first stitch cast on at the beginning, pick up 2 loops at the base of each tendril. Pull the tendrils together and fasten off. With a DPN, pick up 12 stitches around the gathered tendrils. Knit 2 rows of yellow. On the next row, knit into the front and back of each stitch (24 sts). Knit the next round. Knit 2 together on the next 2 rows ending with 6 stitches. Gather these 6 remaining stitches with a darning needle. With a crochet hook pull the remaining tails into the center of the flower for a little extra poof. Wash in warm water and press to block. You can see it pictured above next to its model.

I still have a lot of work to do figuring out the relationship between my fiber and my color mixing. I have abundant resources I can pull from to continue to learn and grow. Letting the color wheel be my guide, I am going to continue working through the flowers of my garden.

