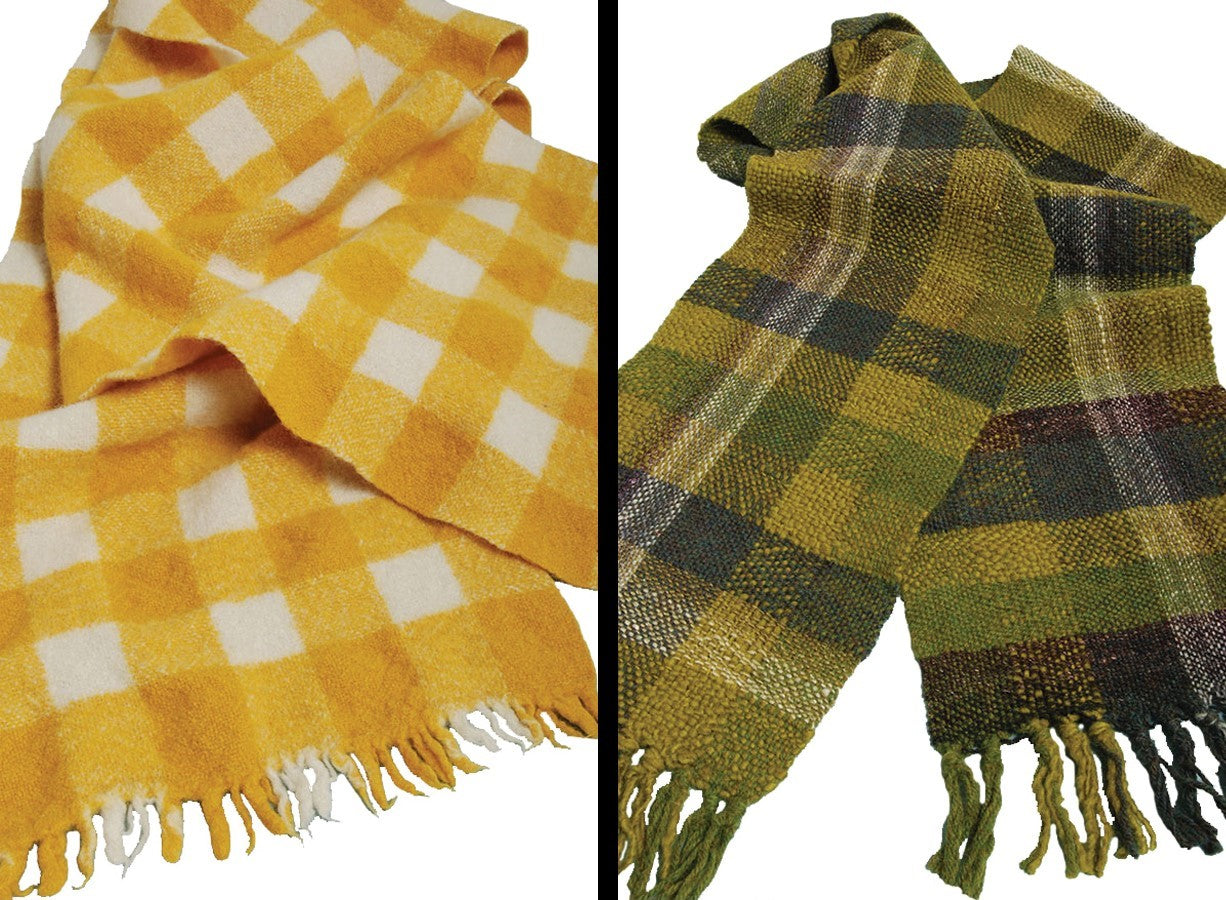
Two Variable Dent Reed Scarves
By Jane Patrick
I’ve woven two simple scarves to demonstrate both the crammed and spaced technique and the mixed fibers technique. The possibilities are endless!
The Winter Gingham Seersucker Scarf
Like many people who have a long, cold winter, I start to get antsy for spring by the time February rolls around. I wanted to create a scarf that was warm enough to protect me from Old Man Winter, but thumbed its nose in his direction. With summery seersucker and gingham fabrics in mind, I created a fulled wool fabric that pays homage to both—bright and cheerful with a slightly puckered look.
Mixed Fibers Plaid Scarf
I chose a fingering weight, two worsteds, and one bulky yarn in greens, brown, and white for this plaid. This is a great stashbusting project: mix and match fibers, colors, and yarn weights. You can weave following your warp color order, or change up the weft colors and stripes however you like.
What You'll Need
-
Harrisville Shetland – 1120 yards in marigold; 800 yards in white
-
20” Flip
-
variable dent reed – (4) 8-dent segments and (4) 12-dent segments
-
Berroco Ultra Alpaca (worsted weight) – 130 yds ea of dark green and medium green
Manos del Uruguay Chunky (bulky weight) – one skein of olive
Noro Silk Garden (fingering weight) – one skein of brown and white - 15” Flip or Cricket (or weave a narrower scarf on your 10” Cricket)
-
variable dent reed – (2) 5-dent segments, (2) 8-dent segments, (1) 10-dent segment
Materials and Equipment for Winter Gingham Seersucker Scarf
Materials and Equipment for Mixed Fibers Plaid Scarf
Directions
Winter Gingham Seersucker Scarf
Set up the variable dent reed by alternating the 8 dent and 12 dent sections. Warp a 4-yard warp (direct method). The marigold is warped through the 12-dent segments (28 ends) and the white is warped through the 8-dent segments (20 ends).
As I wanted a balanced weave, I wove 28 ends of marigold, then 20 ends of white, repeated for the full length of the warp. You will see that the squares where the white intersects are the most loosely woven, and the squares where the yellow intersects are more tightly woven. The white areas will full the most, causing the surrounding squares to pucker in response.
- I may yet use this fabric to make a jacket, so I decided not to knot the fringe. Instead, I did a simple zigzag stitch (use a walking foot if you have one) to secure the cut ends, then cut the fringe to about 2”. The cloth went straight into the washing machine on warm for a regular cycle, and I air dried it from there as my washing machine had done the job.
- If you don’t have experience fulling woven fabric, and more specifically fabric woven with Harrisville Shetland you may want to keep your eye on things. I lost just over a quarter of both the length and the width in the fulling process. But this yarn softens up so nicely, and it’s virtually wind-proof once fulled.
Mixed Fibers Plaid Scarf
Set up the variable dent reed in this order, from left to right: 5 dent, 10 dent, 8 dent, 5 dent, 8 dent.
Warp a 90” warp (direct method), starting on the left: the bulky Manos through the first 5-dent segment, the fingering weight Noro through the 10-dent segment, the dark green Ultra Alpaca through the 8-dent segment, the Manos again through a 5-dent segment, and the medium green Ultra Alpaca through a final 8-dent segment. Be sure to warp through that space between reed sections.
- This is simple to weave – just a plain weave, woven using the same yarns you used in your warp and following the same color sequence in your weft. You are welcome to be particular and weave the exact number of picks of each color to match the number of ends in your warp, or you can eyeball it. When using yarns of different weights, you may find that adjusting the number of weft picks of a particular yarn sometimes works better visually.
- Overhand knot your warp ends, and trim the fringe to about an inch longer than where you want it to be. Wash your scarf gently in warm water and a bit of soap, being careful not to agitate the piece too much. You want the fibers to settle in to their space, but not full. Roll the scarf up in a towel and gently press to remove excess water. Hang to dry and re-trim your fringe to the desired length.

