Putting Novelty Yarns to the Test
By Tanya Poff
I love yarn! . . . and showing off that sumptuous variety we find in local yarn shops, or yarns we spin for ourselves, is one of the greatest strengths of the rigid heddle loom due to its easy tension.
As rigid heddle weavers, we can achieve many effects whether for tapestry, home goods, or clothing. Approaching weaving from a knitter’s perspective, my mission is to create contemporary, wearable pieces from the little loom and share those ideas with fellow weavers.
Spending time designing garments from rectangles requires effective sampling. What better way to test color and fiber interplay for the big stuff than a simple scarf with lots of variety?
When I get my hands on novelties (like the tape, ladder, and fur yarns of my “Confetti Scarf” shown here) I can’t help but challenge them as warp. In my new book, Color and Texture for the Rigid Heddle Loom, I take this challenge to the limit warping with a unique yarn with thick inclusions.
Making your Novelty Yarns Sing
The size of the yarns we’ll use is DK to worsted (Craft Yarn Council #3 - 4) except for the “smooth” yarn which is a sport weight (CYC #2). Using a 12-dent reed creates a close sett, but will give the warp dominance to show off the fancier yarns. The epi (ends per inch) at 12, will be greater than the ppi (picks per inch) at 8.
Interweaving tends to tame even the craziest textures. The secret to creating drape and bringing attention to them, is to put in some “air” by interweaving with a lace or sport weight yarn (8/2 to 5/2 in weaver’s terms). This yarn should have low or no elasticity, so it resists beating. A rayon, tencel, silk, or bamboo (or blend thereof) will give you a softer drape than 100% cotton or linen. Avoid an animal-based fiber like wool to keep the textured yarns from sticking together as you weave.
Varying yarn weight in your warp works well when you isolate the strands by alternating them with no more than 2 ends of each weight. If you place more than 2 ends of varied weights next to each other, your fabric will come off the loom puckering unless you employ a multi-dent reed.
Yarn Description and Numbering for Charts
#1 = tape – 75 yards, Prism Tencel Tape in Indigo, 2 skeins (2oz. = 120 yards). A tape or a ribbon yarn has a flat, woven texture. It is allowed to twist or turn in the weaving and lends additional interest.
#2 = smooth yarn – 236 yards – a yarn of consistent roundness that coordinates with the other yarns in solid, tonal or multicolor. I used Mary Gavan Yarns Sea, 68% Rayon, 32% linen in Root Trail, (510 yards per skein). It has a nice sheen and bright color that enlivens the work.
#3 = ladder – 78 yards, Athena, 80% polyester, 20% nylon (25 gm. = 82 yards). This adds flecks of jewel tones for the confetti effect.
#4 = fur – 43 yards, Prism Plumette in Lichen, 100% nylon (2 oz. = 95 yards). The shorter length of this fur emerges from the woven surface better than a long fur and adds softness and bloom to the scarf.
#5 = ribbon – 32 yards, Louisa Harding Lirico in Nessun Dorma, 50% Cotton/28% Acrylic/22% Polyamide (100 gm. = 262 yards).
What You'll Need
-
5 yarns for warp and weft (described above)
-
rigid heddle loom with at least 10” weaving width
-
12 dent reed
Materials and Equipment
Directions
Warping
- Alternate 1 strand of novelty yarn with 1 strand of smooth yarn. If you have a problem getting a clean shed opening, an extra shuttle, warp stick, or pick-up stick placed in the back shed (behind the reed) can be pushed to the back beam and kept there to force fibers apart as you weave.
- The yarns chosen vary in elasticity. Draw the stretchy loops loosely. The non-elastic yarn will end up a couple inches longer once you wind on, but you can trim it before tying on as there’s extra warp to allow. Do your best to smooth the ends for even tension as you tie on. You can correct any unevenness in your fell line after you have woven an inch or so. You simply pull the bow out where any “hills” rise and pull the ties tighter until the fell line straightens. Loosen the ties where the fell line sinks.
Using the indirect warping method (measuring the yarn on the warping board and then threading the loom) can minimize excess crossing at the back and should be sleyed according to chart B.
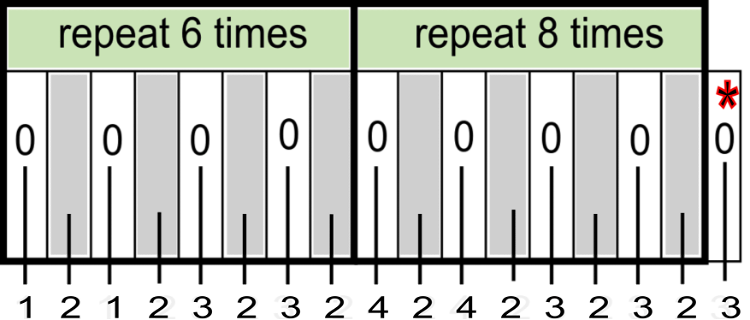
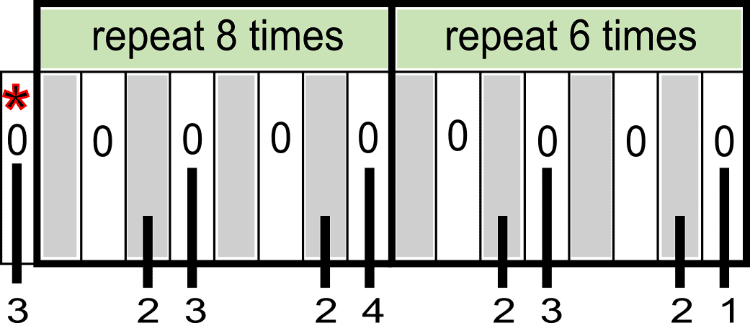
Warp 9-½” x 96”. The charts here are drawn to look like your reed slots and holes from the back of the loom for A and front of the loom for B.

Direct Warping Method
If using the direct, peg warping method, start with chart A. Chart A, from the right, indicates drawing a loop of #1 through a hole, #2 through a slot. Skip a hole and a slot, then draw #3 through a hole, #2 through a slot. Skip a hole and a slot. You’ll perform this sequence a total of 6 times as indicated in the green shaded box over the top.
Continue across with the #2 yarn without cutting and tying off until the end, but you need to tie on, cut, and tie off each of the other yarns to the apron rod every time they appear. Just be careful that #2 goes around the back rod and is placed in the slot to the left of the other yarns each time. Check your work for accuracy every couple of inches.
Continuing left, draw the next sequence 8 times. End with 1 strand of #3*. Tie this one off at the warping peg instead of the back rod. It places the heavier yarn at each selvedge —important to avoid selvedges that contract once off the loom causing the fabric to sag in the middle.
Turn the loom around, starting at the right (chart B), the single end * stays in place. Sley one of the 2 ends in the first slot into the empty slot to the right. Sley one of the 2 ends in the next hole into the empty hole to its right. Repeat this across until every slot and hole is filled in your warp width to end up as shown in B.
Wind on to the back beam as usual and tie knots and bows onto the front rod to reserve fringe.

Weaving
- Weave plain weave for 36” alternating 1 pick of #1 with 1 pick of #2. Switch to 1 pick of yarn #5 alternating with 1 pick of yarn #2 for the remaining 36”.
- Cut your scarf from the loom tying 4-strand tassels. Soak in room-temperature water with mild soap, rinse if the soap requires, squeeze out excess water by rolling in a towel and stepping on it, and hang dry. Cut any hanging weft ends flush and trim the fringe to the desired length.
- Note the variety and value contrast show in the close-up. This is information I can use for future fabric design.

